POS system technical reference
Developing your own POS system has never been easier. This page describes the logic of our free published code: Cash register and the options to explore our whitelabel retail solution.
Why is this cash register the ‘best in the market’?
This cash register follows modern standards of ‘fiscalisation’ and high ‘bookkeeping’ standards and is focused on services processes and management statistics.
These elements may not be the first things you think of when building a cash register but they will follow automatically after you integrated a ‘receipt generating’ function, sending the receipt per email, deducting the stock and saving your customer info.
Why is this POS code 100% free?
As we believe building a cash register is just your basic ingredient to design your ideal retail platform. We hope people will meet our full eco-system on retailgear.com including our product information (PIM) solution.
So this code is one part of a bigger eco-system. Can I get access to the full frontend?
Yes. Actually you can purchase the full frontend – for only 80 USD/euro - in beautiful Metronic8 styling + get an updated version of this app which includes the fiskaly.com/dsfinvk integration and many other usefull features before you start building. We don't advice to use V1-3-15 for professional purposes but use the fully upgraded version! Even the backend code can be purchased. To purchase all the code, create your own platform on https://www.retailgear.com/create-organization and log in as an admin.
What about commercial use?
We offer our full eco-system for commercial use. To upgrade: Login in to your personal admin portal via retailgear.com. We offer a well designed ('Metronic8' theme: https://keenthemes.com/metronic/), a much more extended version of our frontend for just 80 euro one time payment. So you'll get access to almost our whole micro-world of retailgear.com including 80+ extra features to fully manage your retailstore, retail-chain or to refactor an existing cash register software! When you log in to the admin panel of retailgear.com and make a purchase you'll get this full code with a license for commercial use. Find the Non-commercial License in this repo for more info. You can even purchase ALL the backend code of this repository for commercial purposes which allows you to customise your ideal retail solution for commercial use.
How can I try the cash register?
There are 3 ways to try our cash register.
1. If you want to test/review the full functionality of our eco-system,
create a test account on an existing organization. You can do this via:
https://www.retailgear.com/create-test-account
You can also create your own platform and get the full functionality including the Metronic8 theme under your own test domain.
2. If you want to study our code without paying, click on the below button:

github:
https://github.com/retailgear/retailgear-app-cashregister-v1-3-15-plain-bootstrap-license-by-nc-sa
docs:
https://www.retailgear.com/cash-register-technical-reference
3. If you want to code on the full frontend and start a whitelabel test platform for free.
Create your own platform:
https://www.retailgear.com/create-organization
Docs:
https://www.retailgear.com/documentation
Basic functionality and code logic explained
Our system maintains a
day-state to group all the transactions made during the prescribed timeframe.
Following the bucket name, you need to select the region, which will be [REGION-CODE].
Finally create your s3 bucket, and upload your dist folder within the bucket.
You can also connect it to your domain, Use your domain for a static website in an Amazon S3 bucket.
How to deploy your cash register application manually?
The steps are the same as above, but you need to make sure that your webpack.prod.config.js file in your main app is properly configured.
Within the retailgear-app-cashregister-v1 run the terminal and execute ng build –configuration production (Angular), you will get the dist folder, use that folder in your hosting provider.
If you don’t have a hosting provider,
we recommend you to use the AWS S3, you can create a free account on:
AWS Management Console.
What is day state ?
A cash register daily statement (daystate) contains all transactions made from the first transaction of the shift to the last transaction of the shift. A cash register daily statement (daystate) must be opened at the beginning and closed at the end of the shift. At closing, the amount of turnover (sales price x quantity) must be equal to the total of the different payment methods like cash, card, etc. A daystate allows to do a check if money which ‘should’ be in the cash tray is really there. It's an overview on what happened in the store or workstation that day or period. And a final check before this report is sent to the bookkeeper.
You can manage the
timeframe
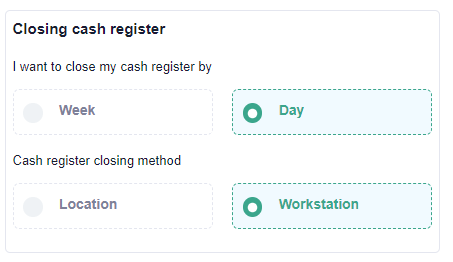
for your cash register closing from the settings.
Go To Dashboard -> Settings -> Cash Register #Closing_cash_register_section (above image).
You can close your cash register on a daily or weekly basis.
Also, you can choose the closing method to be either per location or per workstation.
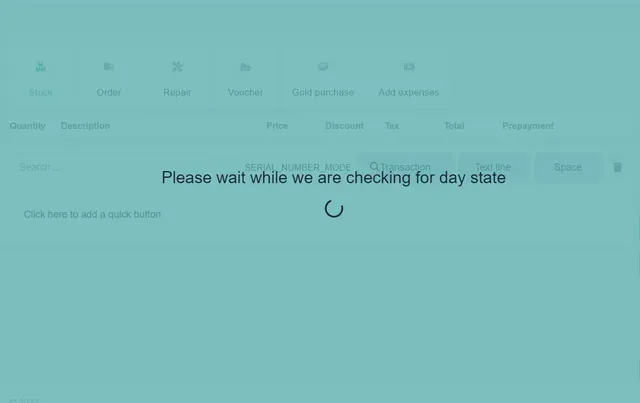
If previous day state was not closed after specified interval (in the shop settings), an alert will be shown:

Core parts of our Cash Register:
As soon as we add product and checkout, we are creating basically 4 types of records
- transaction
- activity
- transaction items
- activity items
For which purpose are the above DB collections used?
Turnover intended for statistics / payment receipts
- The collection of transaction, transactionItems and the associated payments together form the payment receipt generated at a specific time can be called a 'proof of payment'.
- Transaction, TransactionItem and Payment documents are historical documents that do not change.
Transaction
- A transaction is a collection of purchased items purchased at once.
TransactionItem
- One of the items of a transaction. A transactionItem contains its own purchase price, VAT rate and sales price.
- For turnover statistics it is nice if 'similar' transactionItems can be grouped together. For this reason, the transactionItems are stored in a seperate Mongo Collection
- Related to bookkeeping you could say that every seperate transactionItem would relate to a seperate bookkeeping record in the turnover book.
- It's important to create seperate transactionItems for all kinds of records like discounts, tips, etc. as fiscalization requires those to note them seperately from the original item.
Payment
- One (of possibly several) payments used for one transaction. A 'receipt' is generated immediately after the transaction has been paid.
- Related to bookkeeping you could say that every seperate 'Payment' would relate to a seperate bookkeeping record in the payment book.
More DB collections to manage 'service' processes like repairs, projects, etc.
activityItem
- A document where actions related to a single project can be tracked.
- An activityItem can be usefull if multiple receipts are created for the same (service) 'project' over a certain period and you want to have an overview of all related turnover intended for this project.
- Different transactionItems created with different transactions can refer to the same activityItem/project.
activity
- A collection of multiple 'activityItems/projects' intended for one customer.
- An 'activity' is created during the first transaction of the customer where the customer requests multiple projects.
- So is usually created the first time the customer enter's the store and is referred from every transaction related to those projects.
Code logic to create the above db entities/collections
Creation of entities cash register
When we add any product/order to the cash register, it will be processed as a
transaction item by below code:
addItem(type: string) {
this.transactionItems.push({
eTransactionItemType: 'regular',
oType: { bRefund: false, bPrepayment: false },
quantity: 1, the quantity being purchased
price, the price of an article
nMargin: 1, margin of the supplier
nPurchasePrice: 0,
tax: tax, applicable tax on the product
nTotal: type === 'gold-purchase' ? -1 * price : price, total amount to be paid
paymentAmount: type === 'gold-purchase' ? -1 * price : 0, actual paid amount
});
}
Fetch tax information associated with current location:
let taxDetails: any = await this.taxService.getLocationTax(iLocationId);
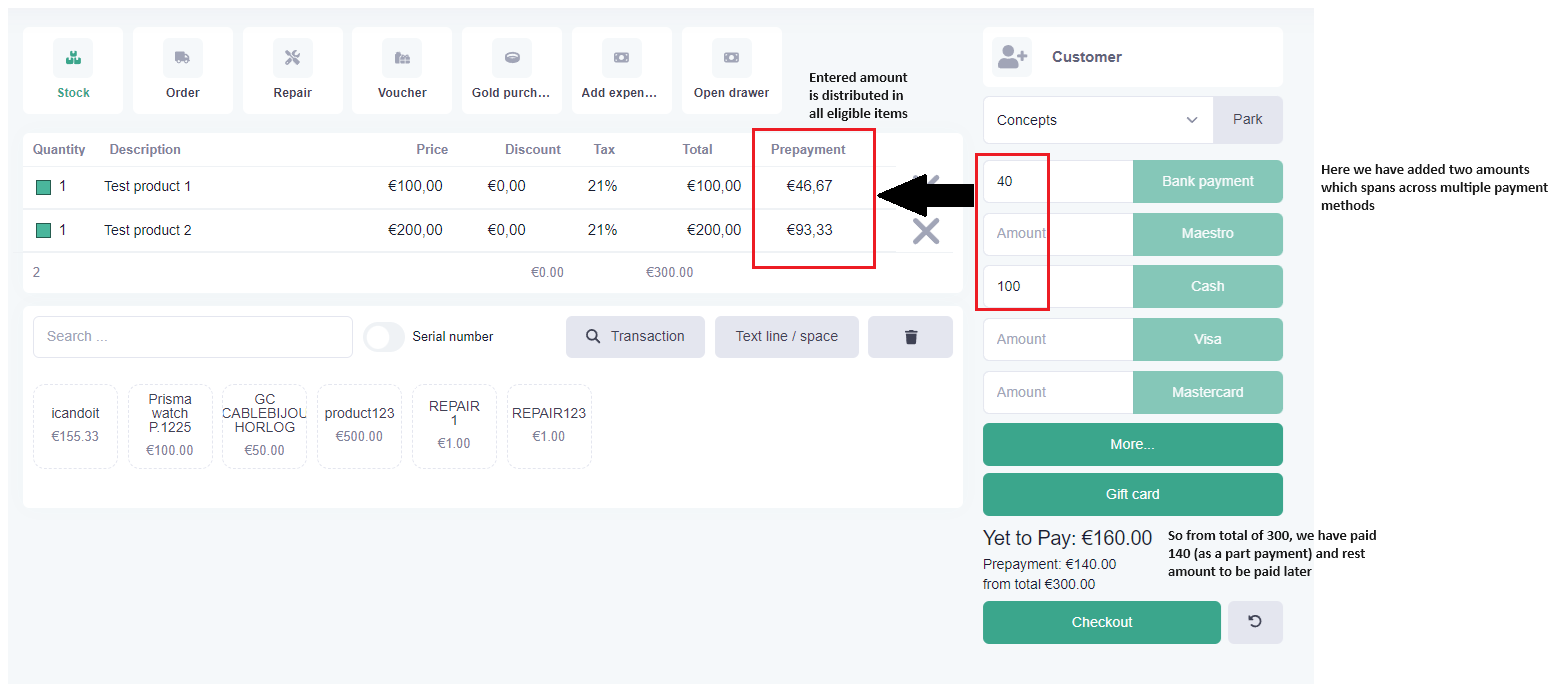
As we support partly payments with multiple items, the paid amount will be distributed among items inside the cash register:
distributeAmount(transactionItems: any[], availableAmount: any) {
transactionItems.forEach((i: any) => {
here we process all the items and distribute money paid between them based on certain
parameters like item type and refund etc.
...
});
return transactionItems;
}
For example:
After checkout, we proceed to create a transaction.
createTransaction()
{
The service will create the payload
const body = this.tillService.createTransactionBody(transactionItems, payMethods,
discountArticleGroup, redeemedLoyaltyPoints, customer);
...
An activity id serves as to keep track of current project
body.oTransaction.iActivityId = this.iActivityId;
Send to the backend
this.apiService.postNew('cashregistry', '/api/v1/till/transaction', body)
...
}
Here are brief insights of createTransactionBody method which prepares the payload to be send to the backend:
createTransactionBody(<arguments>) {
const transaction = new Transaction(
...
eType: 'cash-register-revenue',
...
)
const body = {
iBusinessId: currentBusiness,
iLocationId: currentLocation,
iWorkstationId: currentWorkstation,
transactionItems: transactionItems,
oTransaction: transaction,
payments: this.getUsedPayMethods(false, payMethods),
redeemedLoyaltyPoints,
};
body.transactionItems = transactionItems.map((i: any) => {
const bRefund = i.oType?.bRefund || i.nDiscount.quantity < 0 i.price < 0;
const bPrepayment =
(bRefund && i.oType?.bPrepayment) ||
(
this.getUsedPayMethods(true, payMethods) -
this.getTotals('price', transactionItems) < 0
) ||
(i.paymentAmount !== i.amountToBePaid)
});
const oItem = new TransactionItem();
The selling price including vat rate
oItem.nPriceIncVat = (i.type === 'gold-purchase') ? - (i.price) : i.price;
oItem.nEstimatedTotal = i.nTotal; for repairs it is probable cost, can be change
oItem.nPaymentAmount = i.paymentAmount; the actual amount paid by customer
oItem.nPaidLaterAmount = 0; amount that is agreed be paid later
oItem.nRefundAmount = i.nRefundAmount;
oItem.iActivityItemId = i.iActivityItemId;
oItem.nVatRate = i.tax; applicable tax rate
oItem.nRevenueAmount = i.paymentAmount / i.quantity; revenue generated per item
process the loyalty point items (doing the same for discounts)
if (redeemedLoyaltyPoints && redeemedLoyaltyPoints > 0) {
tItem1.oType.eTransactionType = 'cash-registry';
tItem1.oType.eKind = 'loyalty-points-discount';
tItem1.nPaymentAmount = -1 * redeemedLoyaltyPoints;
tItem1.nRevenueAmount = -1 * redeemedLoyaltyPoints;
tItem1.nRedeemedLoyaltyPoints = redeemedLoyaltyPoints;
We create separate transaction item records for discount and loyalty points
body.transactionItems.push(tItem1);
}
return body;
}
Here is how we are handling it in the backend:
module.exports.createNewTransaction = async (transactionFactory, body, db, res) => {
const { oTransaction, transactionItems, giftCards } = body;
const _Transaction = Transaction(db);
const _Activity = Activity(db);
const _oTransaction = _.pick(oTransaction, [ ... ]
let oCreatedTransaction = new _Transaction(_oTransaction);
if (!_oTransaction.iActivityId) {
if this is new transaction then here we create new activity record
oActivity = new _Activity(activityDetails);
oCreatedTransaction.iActivityId = oActivity._id;
Associate transaction with an activity
oActivity.iTransactionId = oCreatedTransaction._id;
oActivity.eStatus = oCreatedTransaction.eStatus;
oActivity.eType = oTransaction.eType;
await oActivity.save();
} else {
We are modifying existing activity - either refund or part payment
oActivity = await _Activity.findById(_oTransaction.iActivityId);
}
oTransaction.aTransactionItems = oTransaction.aTransactionItems.map((el) => {
process transaction item data here
});
oCreatedTransaction = await oCreatedTransaction.save();
In below method, we are handling transaction items and activity items
const { activityItemPromiseArr, transactionItemPromiseArr, loyaltyPointsArr } =
await this.createTransactionItems(oTransaction.aTransactionItems,receiptNumbers);
let payments = body.payments.map((p) => ({
iPaymentMethodId: p._id,
nAmount: p.amount,
iTransactionId: oCreatedTransaction._id,
iBusinessId: oTransaction.iBusinessId,
iWorkstationId,
iLocationId: oTransaction.iLocationId,
sMethod: p.sName.toLowerCase(),
});
payments = await Payments(db).create(payments);
Let's look deeper into createTransactionItems method:
module.exports.createTransactionItems = async (<arguments>) => {
const _TransactionItem = TransactionItem(dbConnection);
const _ActivityItems = ActivityItems(dbConnection);
const _LoyaltyPoints = LoyaltyPoints(dbConnection);
for (let index = 0; index < aTransactionItems.length; index++) {
Using factory to handle data
const transactionFactory = new TransactionFactory({ db: dbConnection });
const tItem = new _TransactionItem(transactionItem);
let tActivityItem = new _ActivityItems(transactionItem);
if (!transactionItem.iActivityItemId) {
no activity item id means this is a fresh transaction
tActivityItem.nTotalAmount = (transactionItem.nPriceIncVat -
transactionItem.nDiscount) * (transactionItem.nQuantity);
tActivityItem.nPaidAmount = transactionItem.nPaymentAmount;
Associate transaction item with activity item
tActivityItem.iTransactionItemId = tItem._id;
Based on whether item is refund or prepaid, calculating the revenues
if (transactionItem.oType.bRefund) {
It is refund so it will generate negative revenue
...
tItem.nCostOfRevenue = -transactionItem.nPurchasePrice;
tItem.nProfitOfRevenue = (transactionItem.nRevenueAmount +
transactionItem.nDiscount) / (1 + transactionItem.nVatRate /
100) + tItem.nCostOfRevenue;
} else {
Else it will generate positive revenue
...
tItem.nCostOfRevenue = transactionItem.nPurchasePrice;
tItem.nProfitOfRevenue = (transactionItem.nRevenueAmount +
transactionItem.nDiscount) / (1 + transactionItem.nVatRate /
100) + tItem.nCostOfRevenue;
}
Assigning the same costs to an activity item also
tActivityItem.nCostOfRevenue = tItem.nCostOfRevenue;
tActivityItem.nProfitOfRevenue = tItem.nProfitOfRevenue;
} else { We are modifying an existing activity item
tActivityItem = _ActivityItems.findById(transactionItem.iActivityItemId);
tActivityItem.nPaidAmount += transactionItem.nPaymentAmount
Below we are checking all possible conditions based on refund and prepayment
if (transactionItem.oType.bRefund
&& tActivityItem.nPaidAmount === 0){
tActivityItem.bIsRefunded = true;
}
if (!transactionItem.oType.bRefund && transactionItem.oType.bPrepayment){
It is not refund but prepayment so calculate costs from partly paid amount
tItem.nCostOfRevenue = transactionItem.nPurchasePrice;
tItem.nProfitOfRevenue = (transactionItem.nRevenueAmount +
transactionItem.nDiscount) / (1 + transactionItem.nVatRate /
100) + tItem.nCostOfRevenue;
}
if (!transactionItem.oType.bRefund && !transactionItem.oType.bPrepayment) {
It is neither refund nor prepayment means the complete rest of
payment is done so calculate costs accordingly
...
}
if (transactionItem.oType.bRefund && !transactionItem.oType.bPrepayment) {
It is refund and fully paid so we reverse the complete transaction
tItem.nCostOfRevenue = -tActivityItem.nCostOfRevenue;
tItem.nProfitOfRevenue = ((transactionItem.nPriceIncVat -
transactionItem.nDiscount) / (1 + transactionItem.nVatRate / 100) -
transactionItem.nPurchasePrice) * -1;
}
if (transactionItem.oType.bRefund && transactionItem.oType.bPrepayment) {
It is refund as well as only partly paid transaction so will reverse
only paid amount and calculate costs accordingly
...
}
}
}
After processing all the items in above manner, we save it in transaction item
tItem.nTotal = tActivityItem.nPaidAmount;
tItem.nProfitOfRevenue = tItem.nProfitOfRevenue
Here we do stock correction if needed
if ( ( tActivityItem.nTotalAmount === tActivityItem.nPaidAmount || (transactionItem.oType.bRefund &&
tActivityItem.nPaidAmount === 0 )) && transactionItem.oType.nStockCorrection && transactionItem.oType.eKind != 'reservation' ) {
const nStockCorrection = transactionItem.oType.bRefund ? transactionItem.oType.nStockCorrection : transactionItem.oType.nStockCorrection *-1;
const stockCorrectionBody = {
iBusinessId,
iLocationId,
iBusinessProductId,
nStock: nStockCorrection,
eType: 'sell',
oReason,
iProductId,
iTransactionItemId: tItem?._id,
oTransactionItem: tItem,
};
await _.axios('POST', stockCorrectionUrl, stockCorrectionBody, headers);
}
}
Payment methods
We support multiple payment methods, some of which are available by default, which are called default payment methods i.e. cash, bank payment etc.
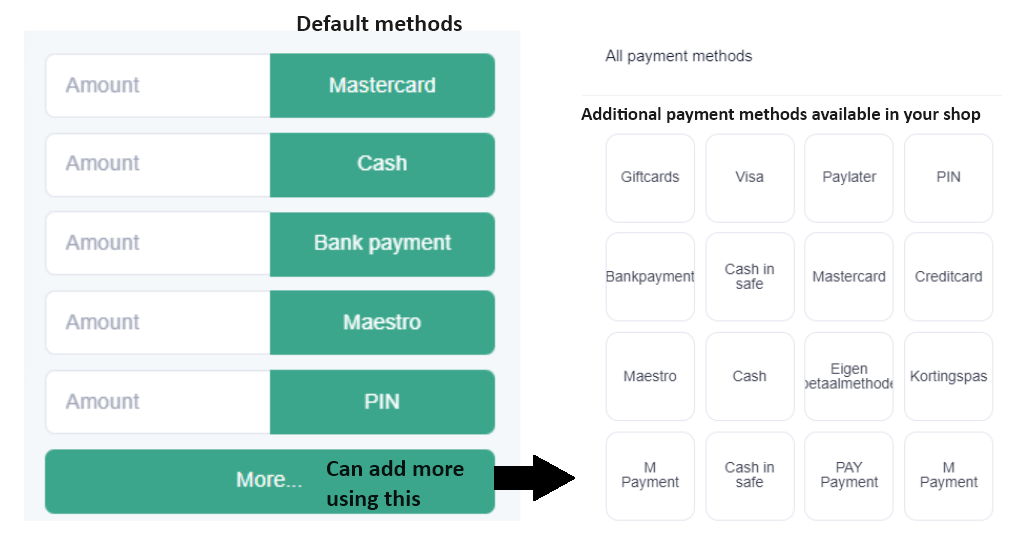
You can add other methods if you want from the available list by clicking on the “More” button as shown above. You can manage which method to show directly in the cash register by their settings.
Go to: Dashboard -> Settings -> Cash Register -> Payment methods (see below screenshot)
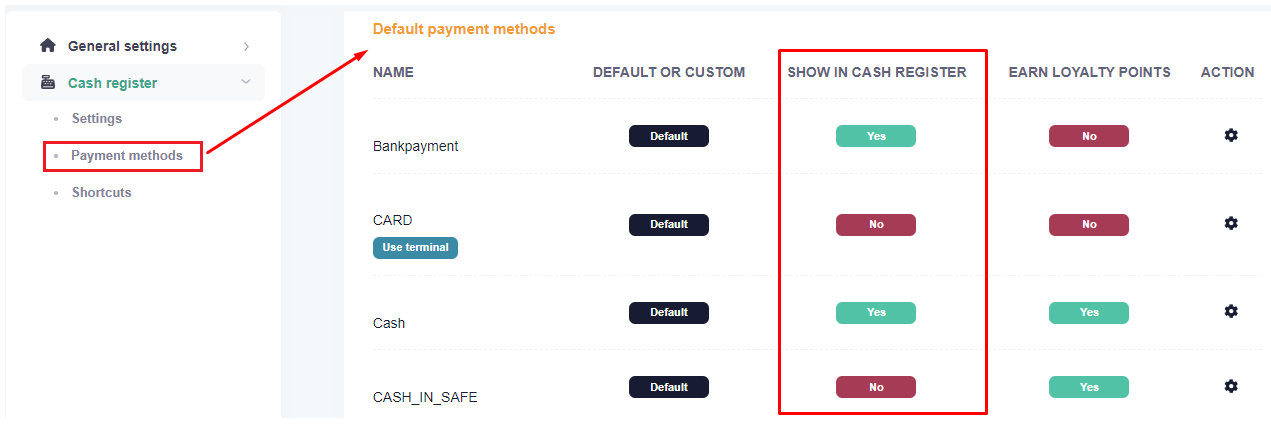
Other settings related to payment methods can also be changed from the action column (see below popup appears after clicking on the wrench/settings icon)
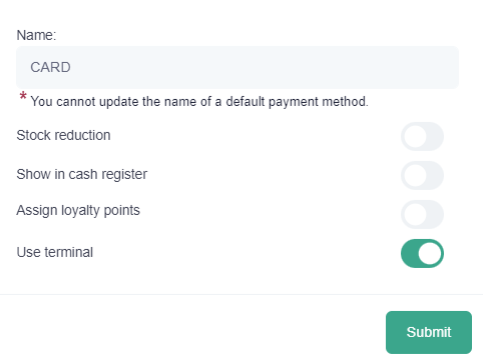
Custom payment methods
You can add your own custom payment methods as per your requirements from the same section.
Also, you can give the ranking to your methods, that is the order in which they will be visible in your cash register.

Payment integrations
In addition to traditional payment methods like cash, bank etc., we do have built-in support for payments using pin terminals.
Go to: Dashboard -> Settings -> Cash Register -> Payment integrations
You can find the payment providers as mentioned below: Pay (https://www.pay.nl/en/)
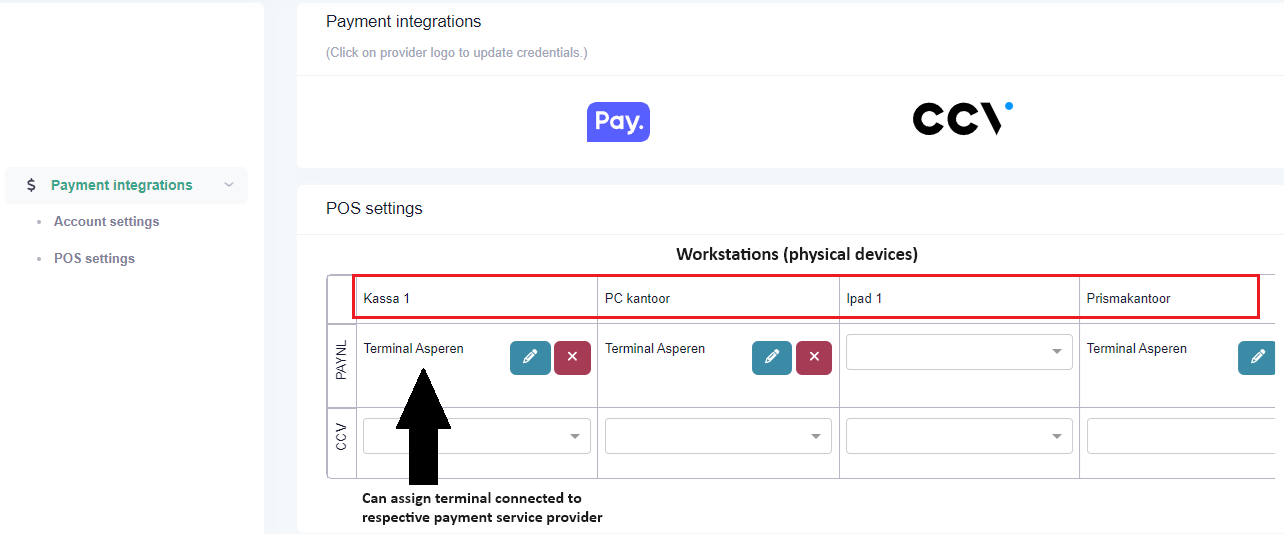
Using this section, you can set your (pay or ccv) account credentials and connect the terminals with your workstations.
Multiple workstations can use the same terminal device to accept the payments. (as shown in above screenshot)
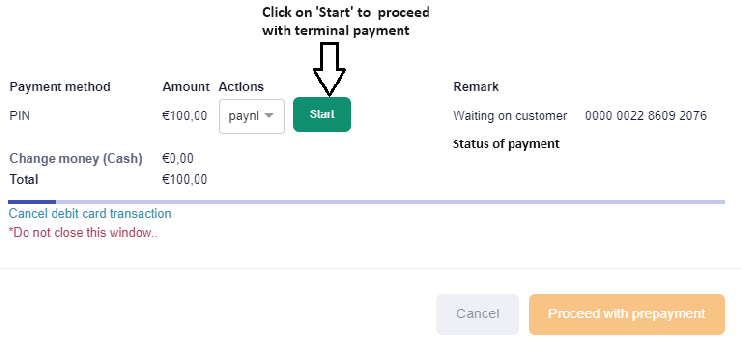
You can assign a terminal with your payment method as shown in below image (left).
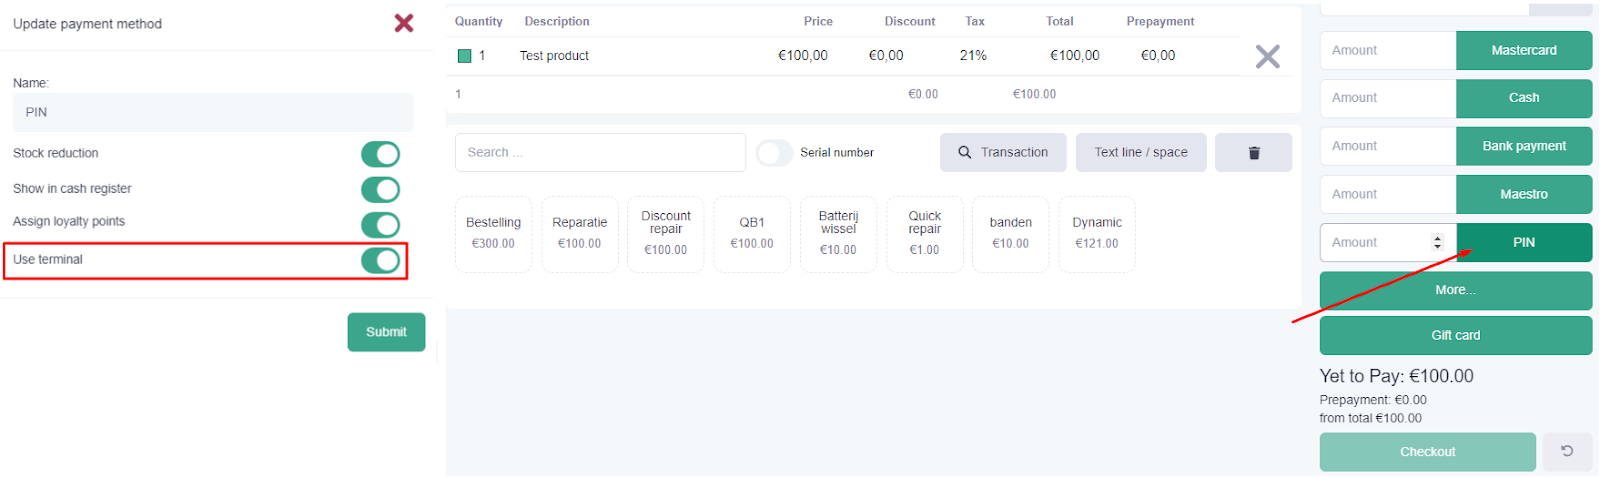
As shown in the above image (right), you can pay with a PIN (which we had set to use the terminal device).
Fiscalisation/TSE, the Fiskaly integration (SIGN DE & DSFinV-K)
Our system has built-in support for the fiskaly (https://www.fiskaly.com/), a 3rd party service which simplifies the world of fiscalization.
We have implemented two of their major APIs as mentioned below.
KassenSichV compliant with SIGN DE
- To register every financial movement we make using our cash register like add/update/remove any item, change the price/qty, apply discount etc.
- It is to track each transaction we create via our system.
DSFinV-K
- To generate legally compliant data exports from POS systems for smooth tax audit.
- It is mainly used for cash point closings.
Their latest documentation can be accessed at https://developer.fiskaly.com/.
As the progressive German ´SIGN DE´ regulations are in many ways indicative for other European countrie´s regulations, the Fiskaly KassenSichV implementation holds a basic implementation for other regulators.
As per their terminology, they have following components:
TSS
- Technical security system
- It represents the set of components that sign transactions
- A TSS can have a number of clients, transactions and exports associated with it.
- It s states are CREATED, INITIALIZED, UNINITIALIZED
Client
- It is the representation of your electronic record-keeping system (ERS)
- Basically it is the physical device (called Workstation in our system) which creates the transactions
- A client must be associated with a TSS
- It can be in one of the states from REGISTERED and DEREGISTERED
Transaction
- It represents a transaction that needs to be signed
- In laymen terms, when you sell any product in cash register, it is created as a Transaction in fiskaly.
- It can be in one of the states from ACTIVE, FINISHED and CANCELLED
Cash register
- It is an entity which can do both electronically accept incoming orders and to complete the payment process electronically
Cash Point Closing
- It is the aggregating summary of a cash point of all individual movements (transactions) with the transaction type 'receipt' for a certain period of time (called day state in our system)
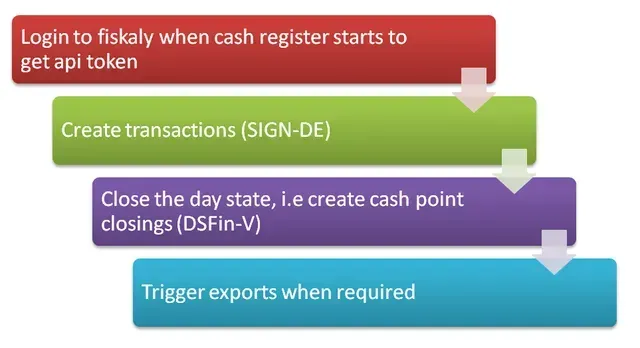
Here is how the fiskaly has been integrated with our cash register. The process broadly includes following steps:
- Create TSS for your business and register clients (workstations) to it.
- Inside the cash register, open a day state and create transactions.
- At the end of day (or week as per your settings), perform cash-point-closings.
From here onwards, we will refer Workstation as Client in fiskaly’s terms.
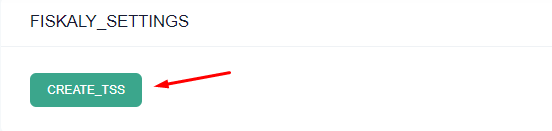
How to create TSS for your business?
Go to: Dashboard -> Settings -> Fiskaly settings
Initially, there will be no TSS created for your business.
You can create one by clicking on the CREATE button as shown below.
Once TSS is created, the UI changes like below.
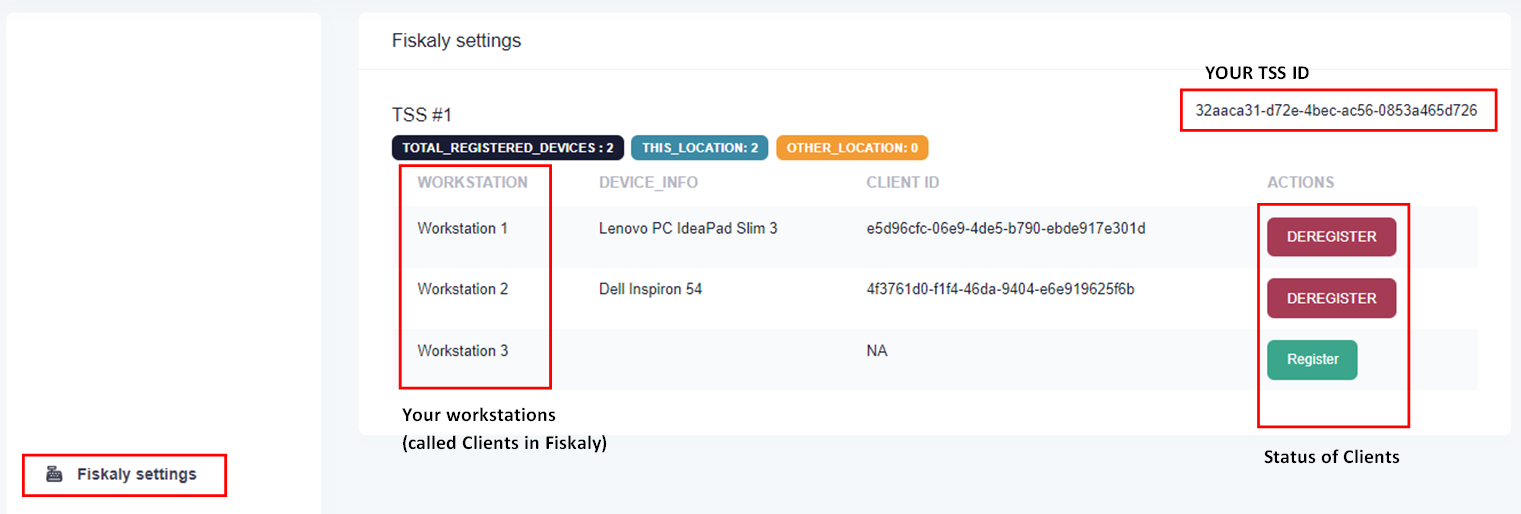
You can see one TSS ID and a list of workstations with its status in fiskaly.
You can register any workstation with the created TSS.
Registering the client implies that the transactions created from it will be signed into fiskaly’s system as well.
⚠️Important points to be noted
You can register many clients under single TSS up to the limit of 199. Once you reach that limit, you need to create another TSS.
Only a client in a "REGISTERED" state can use the TS
Information like brand and model number of a physical device you use as workstation is required in order to REGISTER a client.
You can see one TSS ID and a list of workstations with its status in fiskaly.
You can register any workstation with the created TSS.
Registering the client implies that the transactions created from it will be signed into fiskaly’s system as well.
Fiskaly operations for the cash register
Fiskaly operations for the cash register
Its detailed documentation can be accessed here.
Initially when the cash register loads, we initialize the fiskaly metadata.
For that, we first check whether fiskaly is enabled for the current business or not, and if yes, then we check whether the current workstation is registered as a Fiskaly Client.
We do have a separate service called fiskaly.service.ts to handle all the fiskaly related operations.
File: till.component.ts
mapFiskalyData() {
check if fiskaly is enabled for this business
this.sTssId = await this.fiskalyService.fetchTSS(iBusinessId);
if (this.sTssId)
{
we have TSS ID so fetch client
const result: any = await this.fiskalyService.getClient(iBusinessId,iWorkstationId);
this.fiskalyService.sClientId = result.data.clientInfo._id;
this.fiskalyService.cancelFiskalyTransaction(this.transactionItems);
}
}
To fetch the TSS, we need to first login to the fiskaly by calling below method:
ile: fiskaly.service.ts
loginToFiskaly() {
this.fiskalyAuth = await this.apiService.postNew('fiskaly', '/api/v1/fiskaly/login',
{iBusinessId}).toPromise();
}
Now, as you interact with the cash register, the system will generate the schema to call SIGN-DE API. This is called “signing of the transaction”.
We have following methods defined in fiskaly sevice file to handle this.
Create a payload from the transaction items.
transactionItemObject(transactionItems: any) {
const amounts_per_vat_rate: any = [];
transactionItems.forEach((element: any) => {
...
Set vat rate and amount for each item
amounts_per_vat_rate.push({
vat_rate: 'NORMAL',
amount: String(this.roundToXDigits(amount)),
});
});
return amounts_per_vat_rate;
}
Create payment object separately for cash and non-cash payments.
paymentObject(payment: any) {
const amounts_per_payment_type: any = [];
For cash
amounts_per_payment_type.push({
payment_type: 'CASH',
amount: totalCashAmount,
});
For non-cash payments
amounts_per_payment_type.push({
payment_type: 'NON_CASH',
amount: totalNonCashAmount,
});
return amounts_per_payment_type;
}
Used to create schema for fiskaly transaction.
createSchema(transactionItems: any) {
const amounts_per_vat_rate = this.transactionItemObject(transactionItems);
const schema = {
standard_v1: {
receipt: {
receipt_type: 'RECEIPT',
amounts_per_vat_rate,
amounts_per_payment_type: [
{ payment_type: 'NON_CASH',amount: '0.00'},
{ payment_type: 'CASH', amount: '0.00'}
]
}
}
}
return schema;
}
Below method will be called automatically to start any transaction.
startTransaction() {
if (!this.fiskalyAuth) await this.loginToFiskaly();
const guid = uuidv4(); generate unique id for this transaction
if (!this.tssId) this.fetchTSS(); fetch the tssId
const clientId = await this.getClientId(); fetch client id associated with this tssId
Prepare body to send to the fiskaly
const body = {
'state': 'ACTIVE',
'client_id': clientId
};
const finalUrl = `${this.fiskalyURL}/tss/${this.tssId}/tx/${guid}?tx_revision=1`;
Sending data to the server
return await this.httpClient.put<any>(finalUrl, body, httpHeaders);
}
Everytime we modify something in the item, or we add other items, we also update that to the fiskaly in realtime as well, using below method.
When we add any item by search:
addItem(type: string) {
...
Process stock data here
...
await this.fiskalyService updateFiskalyTransaction('ACTIVE', []);
}
addOrder(product: any) {
...
Process order data here
...
this.fiskalyService updateFiskalyTransaction('ACTIVE', [])
}
Below method is called when we do any changes in an existing item, say update the price, add discount, change quantity etc.
itemChanged(item: any, index: number) {
...
Handle item change event data like update, delete, duplicate etc here
this.fiskalyService updateFiskalyTransaction('ACTIVE', [])
}
updateFiskalyTransaction(transactionItems: any, payments: any, state: string) {
const schema = this.createSchema(transactionItems);
const fiskalyTransaction: any = JSON.parse(localStorage.getItem('fiskalyTransaction'));
if (state === 'FINISHED') {
const paymentObj = this.paymentObject(payments);
schema.standard_v1.receipt.amounts_per_payment_type = paymentObj;
}
const clientId = await this.getClientId();
const body = {
state,
client_id: clientId,
schema
};
...
return await this.httpClient.put<any>(finalUrl, body, httpHeaders).toPromise();
}
We use following method to manage the tss states:
changeTSSState(location: any, bEnabled: boolean, bRemoveFromLive: boolean = false) {
const body = {
bEnabled,
iTssId: location.iTssId,
bRemoveFromLive,
sLiveTssId: '',
fiskalyToken: '',
admin_puk : ''
};
if (bRemoveFromLive) {
body.fiskalyToken = this.fiskalyAuth.access_token;
body.sLiveTssId = location.tssInfo._id;
body.admin_puk = location.tssInfo.admin_puk;
}
return await this.apiService.putNew('fiskaly', `/api/v1/tss/change-state/${iBusinessId}`,
body).toPromise();
}
At any point, one can cancel the current ongoing transaction by calling:
cancelFiskalyTransaction() {
try {
if (localStorage.getItem('fiskalyTransaction')) {
await this.fiskalyService.updateFiskalyTransaction(this.transactionItems, [],
'CANCELLED');
localStorage.removeItem('fiskalyTransaction'); }
} catch (error) { localStorage.removeItem('fiskalyTransaction'); this.fiskalyService.clearAll();
}
}
Fiskaly operations for the cash register
The system will perform this when you perform day state closing. The cash point closing is the aggregating summary of a cash point of all individual movements (transactions) with the transaction type 'receipt' for a certain period. This means that only transactions are aggregated that are relevant for further processing for VAT and/or further processing for VAT and/or income tax purposes.
You can find its detailed documentation
here.
PrintNode
Explaination of the PrintNode integration is coming soon! :)
Metronic8 (KeenThemes) Design template
Why did we go for the implementation of Metronic8 (KeenThemes)?
Working with CSS frameworks without a clear vision can result in a messy process. A process in which clients or developers want to implement a new/extra framework because they have a 'nice' design idea or they have found a 'useful' component.
We followed a few basic principles to develop the retailgear frontend:
For the look and feel we’ve chosen a ‘design’ based framework.
We made the decision and opted for Metronic 8 because:
- It supports Bootstrap 5 as well as Angular/Typescript, both frameworks are widely used for developers to work with.
- It works modernly without 'bright white' colors so that the application that is used intensively is pleasant for the eyes.
- Obviously if we would have chosen a ‘component based’ framework like Angular material or plain bootstrap we would not have gotten this beautiful layout.
- We're using a ‘Core javascript’ approach for things the Metronic8 theme lacks. As you can see Metronic8’s Typescript version has much less components included as we're not using JQuery! We're still happy as we don't need to load in this extra ‘bigger’ libery.
In the above approach we combine beauty, performance, ease of use and the latest version frameworks.
Technical considerations of the Metronic8 theme
- Can I use a different library next to Metronic8?
Yes, you can. We feel it's found to add one bigger library to the front end without degrading the performance too much.
- What libraries can I add extra to the current frontend?
It depends on what you want to achieve. You may prefer Angular Material for example. As this framework offers more components. Mind that if you would go for Angular material this framework is quite big.
There may be more slick options in the market like prime-ng which total size is quite smaller.
- The retailgear frontend consists of micro frontends. How does this impact on the CSS approach?
We have included the framework in the main-app. From the main app any micro frontend like the cash-app or app-directives inherits its styling.
To disable ‘inheriting’ we’ve tried the below approaches:
-> One can use view encapsulation provided by the angular to your components
- The retailgear frontend exposes around 85% of all its code. Why are the app-directives not exposed (only as a ’dist’ folder from S3)?
About 15% of the code cannot be modified. It is essential that this logic remains the same to ensure a robust system. Think, for example, of the authentication of the user, the APIs and search functions in the central database. Also, the product editing options and bulk imports.
Fortunately, by adjusting the general CSS, the styling will be changed. Read more on this here: https://www.retailgear.com/developers
- What other important CSS libraries are used in the retailgear frontend?
We're using
Tailwind CSS (deprecated)
Animate.css
Recommended:
Download the full frontend from the admin panel if you want to have an easy integration! Also the
backend can be dowloaded. This will allow you to start with the all the above mentioned code and even an updated version of our full frontend V1.4+ which includes the Fyskaly DSFinV-K integration
Set up
- How to download retailgear’s frontend repositories.
- How to run the platform on your machine.
- How to use your purchased backend.
- How to create your own microfrontends.
- Microfrontend project example: Jewels and watches (Angular).
- How to create your own micro services.
- Deploy your application, basic steps.
Cash register